Showing posts with label Monica Truempy. Show all posts

Thursday, February 9, 2017

Framed Mario Cross Stitch

        I finally got around to framing the Mario Cross Stitch I had been working on for Alfredo. I used a $10 frame purchased from AcMoore, which included a mat and I happened to have a coupon. I attached the fabric in the frame using command strips so that I could remove the piece later if needed and had some wiggle room when placing. I think this is an easy framing idea for beginners and because the piece is under the mat the edges are hidden :) 


Post again soon :)  

Tuesday, October 4, 2016

Stitch-Tober Days 1 to 4

I am participating in this really cute project called Stitch-Tober where you do a cross stitch each day in October. This is actually my first time doing cross stitch ever. So I will be alternating patterns and finished projects.

October 1st I designed this cute little pumpkin: 


And 

October 2nd I finished my first crochet stitch :)


October 3rd I designed two versions of the same cat:


October 4th I picked the cat design on the left and placed him behind the pumpkin I had stitched previously:


I am so excited to learn cross stitch! So far it has been a fun and wonderful experience :D I've wanted to try it for years and this finally gave me the inspiration and reason.


Thursday, September 15, 2016

Etched Drinking Glasses

I used my new silhouette cameo to etched some glasses. I wanted to make a personalized glass for 
my dad and his friend Libby. Libby is a big fan of a bar called Bobby Ray's and thinks their glasses are cute. So I made her some glasses based on her own fictitious bar. 

My dad, on the other hand is a big fan of rubber ducks. So I made him a beer mug based on the bar from Tangled, the Snuggly Duckling. 

I simply cut the shape I wanted out of contact paper, similar to the bleached shirt tutorial and then use glass etching cream, following the instructions on the container. 


Post again soon, =)


Wednesday, July 13, 2016

Pokemon Go Team Mystic Shirt! DIY

I love Pokemon and Pokemon go is a dream come true for me. I have met tons of people while playing and the first thing people always ask is "What team are you?". So I made some Team Mystic/ Blue Team spirit wear. I have nothing against any of the other teams, I have close friends and family on all the teams, but Blue aligns with me because I love evolution. This shirt has a sort of distressed look to it, which I like. The final image doesn't have a perfect edge, but is definitely clear enough to tell what the object is and helps with the distressed appeal of the shirt.

Here is the finished product:

**The round bubble blotches are from before I started the project. I carried everything home from the store in the same bag and the bleach leaked.


The materials you will need include:

  • A Shirt in the color of your choice
  • Freezer Paper
  • Piece of Cardboard 
  • Bleach
  • A Squirt Bottle
  • An Iron
  • Some kind of cutting tool. 
*Optional: Silhouette machine, Transfer paper

I used my silhouette machine, but that is totally optional and this project can be completed with scissors or an exact-o knife.

Transfer paper is also an optional tool which just makes it easier to transfer the freezer paper to the t-shirt but is not necessary.


The first thing I did was make my design in silhouette and cut it out:

I then spread the transfer paper over the freezer paper and pealed the unwanted parts of the design away. The image below shows what it looks like up to this step:


I then put the piece of cardboard inside the shirt and flipped the transfer paper over so that the wax side of the freezer paper was against the shirt. 


I then ironed it and pulled the transfer paper off, leaving just the freezer paper:


I then sprayed the shirt with bleach using the squirt bottle and waited for the desired level of lightening:


I then filled the bath tub and rinsed off as much of bleach as possible:


I then removed any of the remaining freezer paper that was still attached:


and tossed it in the dryer:


Here is what it looked like at the end:


Tuesday, March 8, 2016

Crochet Cactus

         I made this cute little cactus last night. It didn't go exactly as I planned, but i think it came out ok overall. I just made a basic bulb shape and then pushed in 4 places and sewed it into shape. I made a pom pom from pink and yellow using a pompom maker and then just tied that to the top. I sewed the cactus to the brown felt and then stuffed the felt and placed it in the pot. I then added stitches to each of the four outer edges, which I think adds a prickly look to it.


Thursday, December 17, 2015

Day 4 of the 12 Days of Christmas Challenge! Holly

         The third day of the 12 Days of Christmas is Holly. This was definitely the easiest pattern so far and took about 15 minutes. 

          The pattern is quick, cute, and simple. The berries are so small and cute and assembly was the hardest part. The pattern came from Lion Brand's website again. 


Tomorrow's item is is a Christmas Tree and that looks exciting and I'm looking forward to it.


4/12 Complete =) Post again soon


Tuesday, December 15, 2015

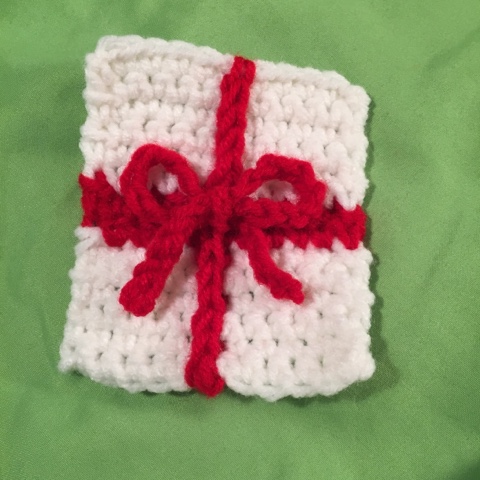
Day 2 of the 12 Days of Christmas Challenge! Present

           The 2nd day of the 12 Days of Christmas Crochet Challenge was a Present. The finished project was bigger than I had expected, at about 3" wide and 4" tall. It was a cute little pattern and used mostly beginner stitches and techniques. I got this pattern from the same place as the wreath, Lion Brand's Website. I think I may try a keep with the classic Christmas colors for most of the challenge.


Tomorrow's item is the Candy Cane and comes from the same site as the previous patterns. I have been super excited to make the candy cane so I hope it goes well.

             
2/12 complete! Post again soon


Sunday, December 13, 2015

12 Days of Christmas Crochet Challenge!!

I had so much fun doing to crochet challenge in October that I decided to make my own challenge. That is how I came up with the 12 days of Christmas Crochet Challenge. Starting on Monday the 14th and continuing for 12 days until Dec 26th I will make one simple Crocheted Christmas item a day. Below is a rough calendar of the items I intend to crochet. 

The first day's item is a Wreath and the pattern I will be using is from Lion Brand's Website. http://www.lionbrand.com/patterns/L32338.html  

Please follow along if you would like =) I chose very simple patterns that should take around 30 minutes a day to complete maximum. 

Post again Soon 

Tuesday, November 3, 2015

Crochet Challenge!! Day 29: Black

The last assigned theme is Black. Black is one of the hardest colors to crochet with, because it is difficult to see what you are doing with such a dark color. As soon as I noticed today's theme was black I knew what I wanted to make. It's a soot sprite from "Spirited Away". I've actually never finished this movie, but Kiki's delivery Service is my favorite movie and they are from the same studio. I simply crocheted a block ball and then Alfredo brushed the surface with a slicker brush until it became this furry, fluffy texture. 


Here is an example of what a slicker brush looks like and I actually found mine at the dollar store. They are meant for brushing animal hair, mostly fluffy dogs.  
You can find the challenge on usscrafty's blog:


Monday, October 12, 2015

Halloween Candy Wrappers

SWE needed a fundraiser for this year and as previously mentioned I love Halloween. So I figured putting them both together was a good idea. I spend a lot of time each day on Pinterest and found this cute idea. They also had a mini version, which is what we eventually used in the sale. This is their PDF for the mini versions. Unfortunately we did not have a paper cutting machine so we cut all of the shapes by hand. 


            When I showed the bats to the group a lot of people mentioned that not everyone likes chocolate. I spent a couple days brain storming and then came up with these. Twizzlers are one of my favorite candies. So I made the Twizzler gut Zombies. One side of the wrappers have been taped back and the other side is stuck through a slit and taped  to the back of the zombie abdomen. It looks like hanging guts which I really enjoy.   


          Then I got inspired to find other shapes that we could make in order to use up other colors in the variety pack paper I had. Ghosts were an obvious choice which I had also seen on Pinterest. I didn't use anyone's actual instructions, but I used the picture featured in this one as inspiration. 


            This is the finished table. We hung a clothes line between two twisty sticks and hung the candies up to bring more attention to the booth and to show off the shape. These would also be cute for parties or trick or treaters.